Page Navigation
- Within the Admin portal, expand Organization and select Assignments from the left side menu.

- This will open a list of all Assignments available to your organization. These are sorted based on whether they are Active, Draft (in progress), or Inactive (archived).

- Click the name of an Assignment to see the Overview tab which displays information from across that Assignment.

- The main part of the overview page will display a table for a quick review of the details of the Assignment.
- The rest of the details for an Assignment are under the following tabs. Which tabs are visible depends on which modules your organization is using.

- Overview – a summary page that displays some details from the other tabs.
- Individuals – a list of individuals assigned to the Assignment, not necessarily all individuals in an ORG.
- Documents – a list of all documents applied to the Assignment and their Acknowledgment status.
- Requirements – all requirements applied to the Assignment.
- Credentials – All credentials held by the Individuals under this Assignment.
- Sharing - For the creation of links used for sharing information about individuals and credentials in that assignment.
- Settings – editable details of the assignment.
Create An Assignment
- Within the Admin portal, expand Organization, select Assignments, and then click the Create assignment button in the top right.

- The Assignment creation process has two steps.
- Step 1 – Details – basic information about the assignment.
- Status (required) - Active or Draft
- Name (required) – the display name for the new assignment.
- Address (optional)
- Country (optional)
- Province/State (optional)
- City (optional)
- Step 2 – Settings – these settings are generally applicable to Accounting or Operational information.
- Default assignment (required) – the Default Assignment is where any newly invited Individuals will be placed upon acceptance of the invite.
- Area (optional)
- Business Unit (optional)
- Code (optional)
- Cost object (optional)
- Start date (optional)
- End date (optional)
- Step 1 – Details – basic information about the assignment.
- All fields are editable during and after the creation process. The details entered in a previous step will be displayed while completing the next step.

- Once all fields have been completed as per your organization's policies click Save assignment at the bottom.

- All these settings can be changed afterward by clicking the Settings tab under the Assignment.

- The Assignment you created is now ready to continue its setup including applying adding Individuals, applying Requirements, or setting a Daily Check. Adding Documents to your Assignment is done from the Documents page.
Complete Assignment Creation - Add Individuals
All the steps outlined in the next sections assume that the requirements have already been created and Individuals have already been added to the ORG and are ready for assigning. The following sections should be completed in sequential order to prevent extra steps during setup.
- Click on the Assignment name to continue the setup.

- The Overview page will open for the Assignment. Select the tab to be edited next. Click Individuals.

- Instead of adding new people to the Organization, this step will assign people already in your organization to the Assignment. Individuals can be assigned to multiple Assignments. Click the Add individual.

- Select the people to be added to the assignment and click Add.

- Once added you will see a success message and the Individuals will be listed below it. Individuals can be removed from an Assignment without being removed from the Org. You can remove them by using the Garbage icon.

Complete Assignment Creation - Requirements
- Within the Assignment, click the Requirements

- Within this screen, you will be able to add requirements to the Assignment and then assign them to all, or only select Individuals within the Assignment. Click Add requirement

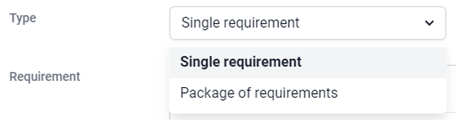
- Within this window, select whether to add a single requirement or a package of requirements from the drop-down. The Add and Assign process is the same for both.
- Now select the Requirements you want to be applied to this Assignment and click the Add button when complete.

- Once applied, the Requirements you selected will be listed under the Requirements tab along with a table showing the status of the fulfillment for those requirements.
NOTE: Prior to using the Assign requirement step, none of the Individuals will have this requirement in their notifications dashboard. The table, at this point, only displays previous fulfillments requested of that individual, if any, from other assignments of which they are a member.
- Now, click Assign requirement to apply these to the people in the assignment.

- Select the Requirement to be assigned. Then select whether it is a Mandatory requirement (Mandatory applies the requirement to every individual as they are added in the future). If not Mandatory, then select the Individuals this requirement applies to and click Assign.

- The updated status of that requirement is now displayed on the Requirements
-
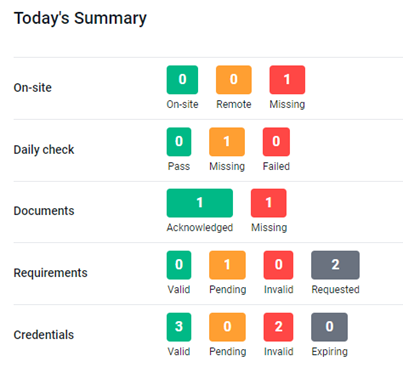
- Requirement – the name of the requirement to which the information applies.
- Individuals – the number of Individuals the requirement is assigned to.
- Valid – the number of submitted valid credentials from the assignees.
- Invalid – the number of credentials submitted that have since expired or become invalid since submission against the requirement.
- Expiring – the number of people with valid credentials that will expire within 30 days.
- Pending – The number of people who have a matching credential that has not been verified yet.
- Missing – the number of people that have responded that they do not have a matching credential for this requirement.
- Requested – the number of people a credential has been requested from but that have not responded to the request yet.
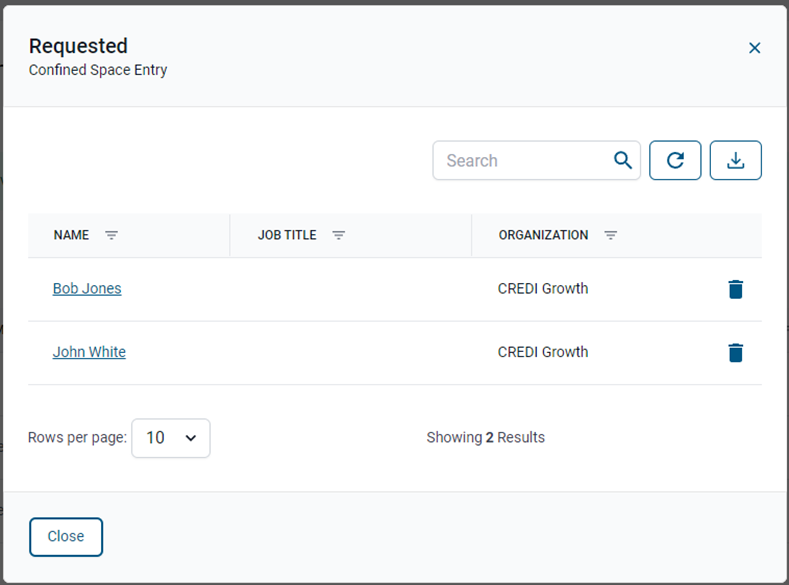
-
- Clicking on any of the numbers will display a list of the individuals in that category.